Bank Statement Conversion: A Complete Guide for Accountants
Step-by-step process to convert bank statements: pick extraction method, clean the ledger, verify balances, and export ready for import.
Last updated 2026-07-09
If the export does not match the bank balance, do not import it. In my view, bank statement conversion comes down to 3 jobs: pick the right extraction method, clean the ledger, and check the math before anything goes into QuickBooks or Xero.
I’d sum up the process like this:
- Use PDF parsing for text-based bank PDFs
- Use OCR + statement-aware extraction for scans and phone photos
- Standardize dates, amounts, debit/credit columns, and balances
- Remove headers, footers, page numbers, and subtotal lines
- Check that Opening Balance + Credits - Debits = Closing Balance
- Export to Excel for review and CSV/QBO/Xero CSV for import
- Keep client files safe with encryption and file deletion after export
A few small errors can cause big cleanup work. One skipped row, one flipped sign, or one subtotal pulled in as a transaction can throw off the whole ledger by $100, $1,000, or more. That’s why I’d treat conversion as a review process, not just a file export.
Here’s the short version:
| File type | What I’d use | Main risk |
|---|---|---|
| Text-based PDF | Direct parser | Column mix-ups at page breaks |
| Scanned PDF | OCR + statement-aware parser | Missed rows, bad numbers, merged text issues |
| Phone photo | OCR + manual review | Cropped edges, blur, tilt, low contrast |
So the goal is simple: turn messy statements into a clean ledger with Date, Description, Debit, Credit, and Balance, then confirm the totals before import.
Converting PDF Bank Statements into CSV or QuickBooks Bank Feeds (for Desktop or Online)
Source files and choosing the right conversion method
File type has a direct impact on extraction accuracy. So the first step is simple: match the conversion method to the source. In most cases, that means figuring out whether you're working with a text-based PDF, a scanned PDF, or an image.
Text-based PDFs, scanned PDFs, and phone images
Native PDFs downloaded from a bank portal usually include selectable text. That makes them much easier to process, because a bank-aware parser can pull transaction rows straight from the file and keep the table layout intact.
Scanned PDFs and phone photos are different. They're image-based, which means the data has to be read from the page itself. And that's where problems start. Low contrast, tilted pages, cropped edges, and blurry photos can lead to missed rows, mangled numbers, and page-break mistakes. A generic converter may even treat subtotal lines like normal transactions, which throws off totals before reconciliation.
OCR and bank-aware parsing
Scanned files and phone images need OCR to read the text. Even then, financial data still needs a review.
OCR by itself doesn't solve the whole problem. A bank-aware parser takes the extracted text and maps it into a structured ledger. These tools can spot headers, footers, and debit and credit columns the right way, which generic converters often miss [1]. That extra context is the difference between a clean export and a file that needs a lot of manual cleanup.
After extraction, normalize the data format before export.
Handling U.S. and international number formats
For U.S. workflows, dates should be normalized to MM/DD/YYYY or YYYY-MM-DD, and amounts should use standard U.S. formatting, such as $12,450.75.
International statements need the same cleanup before import. Indian lakh/crore notation, such as 1,00,000 for 100,000, has to be converted into standard U.S. accounting format. Comma-decimal formats also need to be standardized to prevent import and reconciliation errors [1].
Once the data is normalized, it's ready for column cleanup and export.
The conversion workflow from upload to clean output
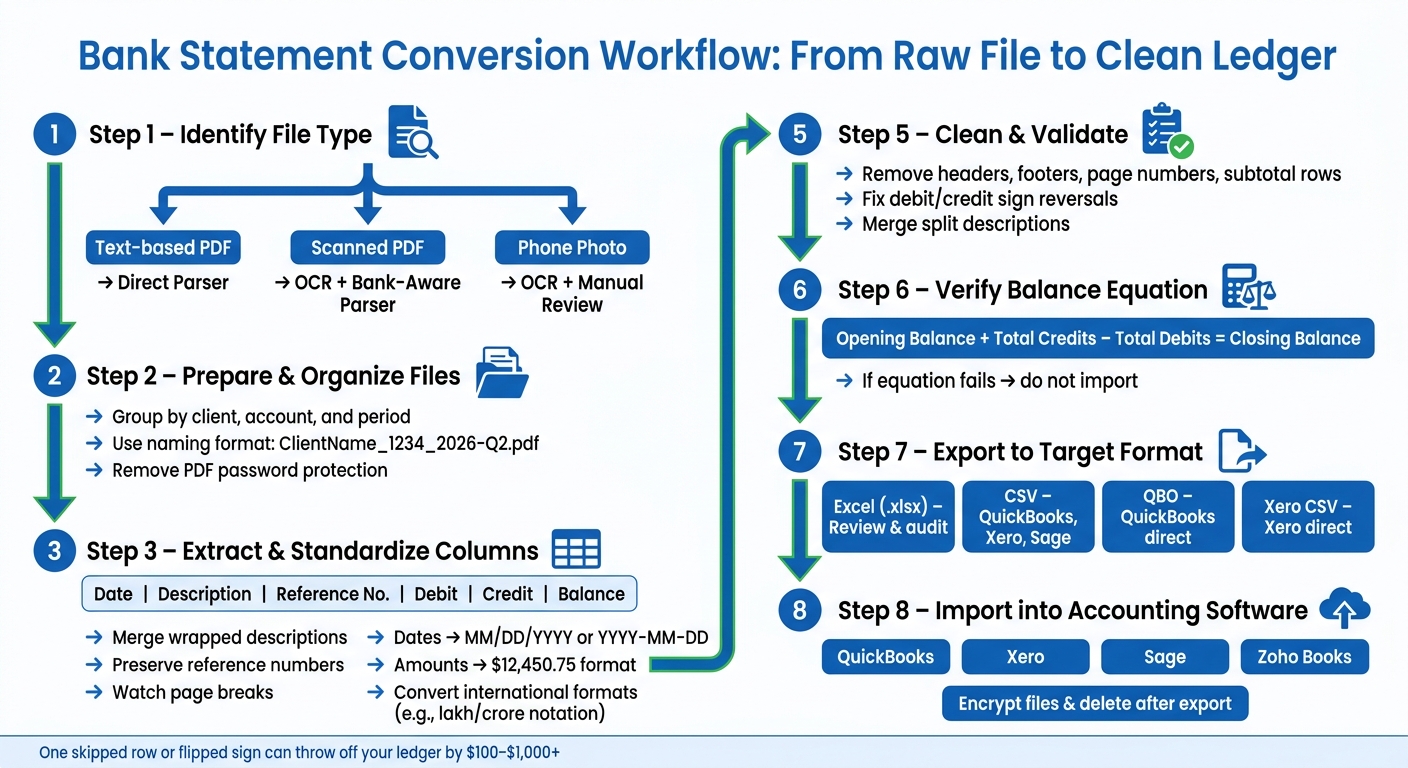
Bank Statement Conversion Workflow: From Raw File to Clean Ledger
A repeatable workflow saves time when you're processing statements for dozens of clients across multiple reporting periods. The aim is simple: move from raw files to clean, import-ready data without redoing setup every time.
Prepare and batch your statement files
Once dates and amounts are normalized, follow the same path for each batch: upload, extract, export.
Start with file organization before anything goes into the system. Group statements by client, account, and period. A naming format like ClientName_1234_2026-Q2.pdf makes each file easy to track and helps avoid mix-ups when you're handling several accounts at once.
Before uploading, check for password-protected PDFs and remove the passwords so the parser can read the file. If you're working through large client batches, upload files in groups to cut handling time.
Extract transactions and standardize columns
Once the files are in order, extraction should give you one standard ledger.
The parser should output a clean table with Date, Description, Reference Number, Debit, Credit, and Balance. When those columns stay the same across banks and periods, reconciliation gets much easier.
Two small details have a big effect.
- Merge wrapped descriptions into one cell. If a transaction description runs onto a second line in the PDF, a bank-aware parser should rebuild it into one cell instead of splitting it into two rows.
- Preserve reference numbers. ACH transfers, wire payments, and card transactions all carry reference IDs that need to stay intact. If those IDs disappear, your audit trail ends up with holes that are a pain to rebuild later.
During review, watch page breaks closely. The first and last transactions on each page are where PDF parsers most often fail. Rows may be skipped or duplicated right at the break [1]. Compare the export against the source PDF to spot missing rows, duplicate rows, or debits and credits that got flipped.
Export to Excel, CSV, QuickBooks, Xero, and other formats

The best output format depends on what you need to do next. Excel is the better choice when you want to review, filter, or build a working ledger before import. CSV is the usual format for imports into QuickBooks, Xero, Sage, and Zoho Books. Formats like QBO and OFX are meant for specific software setups [1].
| Format | Best Use Case | Key Import Note |
|---|---|---|
| Excel (.xlsx) | Manual review, filtering, and audit-friendly working ledgers | Best as a working file before final import |
| CSV | Standard import for QuickBooks, Xero, Sage, and Zoho Books | High compatibility, but less convenient for review |
| QuickBooks (QBO) | Direct import into QuickBooks Online/Desktop | Transaction IDs can help prevent duplicate entries |
| Xero-ready CSV | Direct import into Xero | Requires specific header names for Xero mapping |
A simple rule works well here: use Excel for review, then export to CSV or whatever import format the system requires.
Treat the exported file as your working copy for cleanup and reconciliation.
sbb-itb-2afa642
Validation, cleanup, and reconciliation checks
After export, do a quick QA pass before you import anything into accounting software. This step is small, but it can save a lot of cleanup later inside QuickBooks or Xero. A few focused checks will catch problems that are easy to miss at first glance.
Clean dates, amounts, and transaction descriptions
Start with the basics. Dates should use one format from top to bottom. In U.S. workflows, many teams standardize to YYYY-MM-DD for imports. Pay close attention to dates that may have been inferred from a statement-period header instead of printed on each transaction line. Standardize negative amounts, and make sure debit and credit signs are assigned correctly. [1]
Then check that debits and credits sit in the right columns with the right signs. Sign reversals can slip by during a fast review, but they can throw off your reconciliation right away. A debit shown as a credit, or the other way around, will break the math. [1]
You should also remove non-transaction rows that got pulled in during extraction, such as:
- repeated headers
- footers
- page numbers
- subtotal rows
If those stay in the file, your totals will be overstated. [1]
One more thing: make sure wrapped descriptions from the PDF have been merged into single cells. If a description is split across rows, auto-categorization can read it the wrong way and sort the transaction into the wrong bucket. [1]
Verify balances and spot extraction issues
Before import, confirm that Opening Balance + Total Credits − Total Debits = Closing Balance. [1][2] If that equation doesn’t hold, something was likely skipped, duplicated, or pulled in the wrong way during extraction.
It also helps to review any parser-flagged rows against the source PDF before moving on. This is where odd formatting, broken lines, and bad column mapping tend to show up. Also watch for subtotal rows that may have been extracted as if they were single transactions, since that will double-count amounts in your totals. [1]
Categorize transactions before import
Assign common categories in the spreadsheet before import. It makes the next reconciliation step much smoother and cuts down on manual work later.
Once the balances check out and the categories are in place, the file is ready for import. After that, the next step is secure tool selection and client-data handling.
Security, tool selection, and conclusion
What to look for in a conversion platform
Generic converters often miss the structure of a bank statement. That can lead to wrapped descriptions getting split, running balances getting warped, and rows disappearing at page breaks. It sounds like a small issue until you're cleaning up a mess in Excel.
A better platform should handle bank statements the way they’re actually built, not like any other PDF. Here’s what to check:
- Bank-aware parsing that recognizes specific statement layouts instead of treating every PDF the same
- Built-in balance verification that checks Opening Balance + Credits − Debits = Closing Balance before export [1]
- OCR support for scanned and image-only PDFs, not just text-based files [1]
- Accounting-ready output with standard columns: Date, Description, Debit, Credit, Balance, Category [1]
- Batch upload for processing multiple client files at once [1]
- Format flexibility across Excel, CSV for QuickBooks and Xero, OFX, QBO, QIF, and MT940 [1]
Functionality matters. But how the platform handles files matters just as much.
Privacy and compliance for client financial documents
Bank statements contain sensitive financial data. When you're working with client files, security isn’t a nice bonus. It’s part of the job.
Choose a platform that encrypts data in transit and deletes files after export. If a tool keeps files around for later reprocessing or AI training, that adds risk you don’t need.
Conclusion: A clearer path to faster and safer statement processing
The practical rule is simple: match the file type to the right extraction method, verify balances, and protect client data before import.
FAQs
When should I use OCR?
Use OCR when you're dealing with scanned bank statements, image-heavy files, or older multi-page documents that don’t contain selectable text. If a PDF already has live text, you can often parse it without OCR. But when the document is basically a stack of images, OCR does the heavy lifting.
It reads the page, pulls out the text, and helps rebuild the statement into usable rows with dates, descriptions, and amounts. That makes it possible to turn non-digital files into clean, balance-verified Excel or CSV data.
How do I catch missing or duplicate transactions?
Use automated balance verification during conversion. The system checks whether the opening balance, plus total credits, minus total debits, equals the closing balance.
Because this check happens before export is final, it flags issues like missing transactions or duplicate rows right away. That helps keep exported data accurate and stops errors from slipping into your accounting software or reconciliation workflow.
What format should I import into QuickBooks or Xero?
Use Excel or CSV.
Make sure the converted file includes accounting-ready columns such as Date, Description, Debit, Credit, Balance, and Category. That fits the usual export-and-import workflow and makes it easier to upload cleaned, balance-checked data for reconciliation.
Loading interactive converter… Try ClearlyLedger free