How to Import Bank Statements into QuickBooks
Five-step guide to convert, clean, map, and import CSV, QBO or PDF bank statements into QuickBooks, then reconcile and fix import errors.
Last updated 2026-07-06
You can import bank statements into QuickBooks in five steps: get the file, clean it, map the columns, import it, and reconcile it. If your bank offers a .qbo file, use that first. If not, use CSV. If you only have a PDF, convert it to CSV before you import.
Here’s the short version:
- Bank feeds work for recent activity, often just 30 to 90 days
- Manual imports help with older, missing, or failed bank feed data
- QuickBooks Online can import CSV, QBO, QFX, and OFX
- QuickBooks Desktop mainly uses QBO Web Connect
- Your file should usually include Date, Description, and Amount
- Use dates like 07/06/2026 or 2026-07-06
- Format amounts like 1234.56
- Make withdrawals negative and deposits positive
- In QuickBooks Online, split files over 350 KB or 1,000 lines
- After import, review matches and check for duplicates
If I had to boil the whole process down, it would be this: the import itself is the easy part. Most problems come from messy files, bad date formats, extra rows, sign errors, or overlapping date ranges.
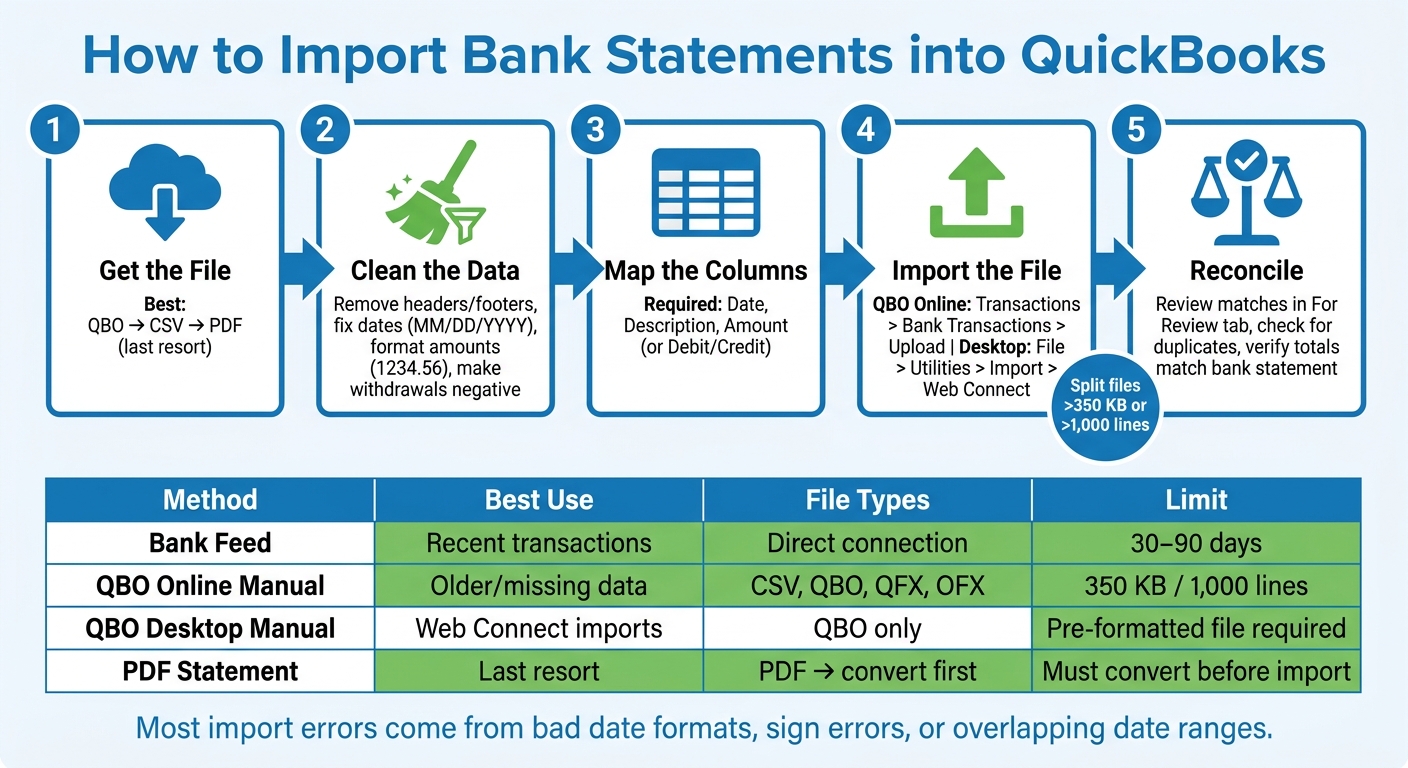
How to Import Bank Statements into QuickBooks: 5-Step Process
Importing Bank Transactions into QuickBooks from PDF or CSV Bank Statements
sbb-itb-2afa642
Quick Comparison
| Method / Version | Best Use | File Types | Main Limitation |
|---|---|---|---|
| Bank feed | Recent transactions | Direct bank connection | Often limited to 30–90 days |
| Manual import in QuickBooks Online | Older or missing transactions | CSV, QBO, QFX, OFX | CSV needs column mapping |
| Manual import in QuickBooks Desktop | Web Connect imports | QBO | More rigid file setup |
| PDF statement | Last option when no export exists | Must be converted to a compatible format first |
So if you want fewer import errors, do this first: pick the best file type, clean the data, then import only the date range you need.
Prepare Your Bank Statement Data Before Import
Clean input cuts down on import errors and cleanup work during reconciliation.
Download the Best Available File Format from Your Bank
Start with a QBO file if your bank offers it. If not, use CSV or Excel. Only fall back to PDF when there’s no structured export at all.
QuickBooks Online also accepts CSV and OFX-based imports. If your bank only gives you CSV or Excel, you’ll map the columns by hand later.
It also helps to separate two kinds of PDFs:
- Text-based PDFs have selectable text
- Scanned PDFs are image files and need OCR before any transaction data can be pulled out [1][5][9]
If your bank export is a PDF, convert it into structured data before you map fields in QuickBooks.
Convert PDF Bank Statements into CSV or Excel
If you can’t get a structured download, convert the PDF to Excel first.
This is where things often get messy. Bank PDF layouts can vary a lot, and generic converters may scramble rows and columns. Use a tool that can handle OCR for scanned PDFs, multi-page parsing, and export to CSV, QBO, OFX, or Excel.
After extraction, clean the columns and standardize the dates and amounts before import.
Clean Columns and Normalize Data to US Formats
Your file should include the minimum fields QuickBooks expects: Date, Description, and Amount. You can also use separate Debit and Credit columns instead of one Amount column.
Before you upload, fix these items:
- Remove anything that isn’t transaction data, such as account headers, statement summaries, footer totals, and blank rows. QuickBooks expects one header row followed by transaction rows.
- Standardize dates to MM/DD/YYYY for U.S. imports, or use YYYY-MM-DD if you want to avoid confusion.
- Format amounts as
1234.56, with no$signs or commas. - Use a normal negative sign for withdrawals. Parentheses and other styles may not import well.
- Leave out the Balance column. QuickBooks recalculates that on its own.
Only combine Debit and Credit into one Amount column if your import file needs it. In Excel, use =IF(Credit<>"", Credit, -Debit), then paste the results as values before deleting the source columns [4].
Once the file is cleaned up, you’re ready to map it to QuickBooks' import fields.
Format and Map Your Data for QuickBooks
Now it’s time to turn your cleaned statement into a QuickBooks-compatible CSV without a fight.
Choose CSV or QBO Based on Your QuickBooks Version
The file type you choose affects how much hands-on setup you’ll need during import. QBO is the cleaner option because it includes transaction IDs that help QuickBooks match entries and cut down on duplicates. If QBO is available, use it. If not, go with CSV.
A simple rule of thumb:
- Use QBO for the least manual work
- Use CSV only when you need to map fields yourself
- Save Excel files as CSV before importing
- Split large CSV files by month before upload
Once you’ve chosen the file type, the next step is lining up your columns with QuickBooks’ import fields.
Map Date, Description, Amount, Debit, and Credit Columns
QuickBooks Online accepts either a 3-column format - Date, Description, Amount - or a 4-column format - Date, Description, Debit, Credit [1][5].
Map:
- Date
- Description
- Either Amount or Debit/Credit
If your source file uses separate Debit and Credit columns, combine them into one signed Amount column before upload. Enter debits as negative numbers and credits as positive numbers [5][11].
That small step can save a lot of cleanup later.
Before you upload, do one last pass to make sure the file structure and totals still look right.
Run Validation Checks Before You Upload
Open the CSV and confirm the basics:
- It uses comma delimiters
- It isn’t password-protected
- It doesn’t contain hidden characters
- It has only one header row [7][11]
You should also make sure the statement totals reconcile. This helps catch silent corruption, where a file imports fine on the surface but brings in the wrong numbers [10][8].
One more thing: remove weekday text from dates before upload. For example, change 07/06/2026 MON to a standard date format [1].
Import the File into QuickBooks Online or QuickBooks Desktop

Pick the route that fits your QuickBooks version. QuickBooks Online lets you manually import U.S. Bank statements. QuickBooks Desktop uses Web Connect instead.
Upload a CSV or QBO File in QuickBooks Online
When your file is ready, upload it in QuickBooks Online. Go to Transactions > Bank transactions, click Link account, then choose Upload from file [1][6][12]. QuickBooks Online accepts CSV, QBO, QFX, and OFX files [1][6].
After you pick the file, choose the right bank or credit card account from the QuickBooks account dropdown. If you're importing a CSV, make sure the file follows the same field order you mapped earlier.
There’s one limit to watch: split the file before upload if it’s over 350 KB or 1,000 lines [1][12]. Then review the preview and import the file. Your transactions will move into the For Review tab.
Before uploading, check the date of the last transaction already in QuickBooks. Overlapping date ranges are a common cause of duplicate entries [6][3].
Import a QBO Web Connect File in QuickBooks Desktop
Desktop follows a stricter path.
Go to File > Utilities > Import > Web Connect Files, then select your .qbo file [6][13].
When the Select Bank Account dialog opens, choose Use an existing QuickBooks account. Then select the matching account from your Chart of Accounts. After the file loads, the transactions appear in the Bank Feeds Center, where you can review, match, and add them [6][13][14].
QuickBooks Desktop imports .qbo Web Connect files, so a CSV file usually needs to be converted first [6]. If the import finishes but no transactions show up, check whether the <ACCTID> in the .qbo file matches the account number QuickBooks has on file [7].
QuickBooks Online vs. QuickBooks Desktop: Import Differences
Use this table to make sure you're following the right import path.
| Feature | QuickBooks Online | QuickBooks Desktop |
|---|---|---|
| Column Mapping | Interactive wizard for CSV [5][12] | Rigid; requires a pre-formatted .qbo [5] |
| Max Upload Size | 350 KB, 1,000 lines [1][12] | No stated limit [13] |
| Account Setup | Can create a new account during import [5] | Account must exist before import [5] |
| Review Location | For Review tab in Bank Transactions [1][12] | Bank Feeds Center [6][13][14] |
Online gives you more room to work with. Desktop is stricter and depends on a preformatted .qbo file.
Fix Import Errors and Reconcile Your Transactions
Common Import Problems and How to Fix Them
After upload, fix any rejected rows before you start matching transactions. If QuickBooks rejects the file, these are the first things to check.
| Common Import Problem | Likely Cause | Direct Fix |
|---|---|---|
| Invalid Date Format | Wrong date format | Reformat dates to YYYY-MM-DD or MM/DD/YYYY [1][10] |
| Broken Amount Formatting | Non-numeric amount characters | Strip all non-numeric characters except the decimal point and minus sign [1][5] |
| Reversed Debit/Credit Signs | Debit/Credit signs reversed | Money out must be negative, money in must be positive in a single Amount column [2][3] |
| Duplicate Transactions | Overlapping date range | Trim the file to start after the last reconciled date; use .qbo for automatic deduplication [10][16] |
| "We can't read this file" | Raw PDF or malformed .qbo | Re-export as CSV or QBO, then check the .qbo header [3][15] |
| Unsupported Columns | Extra columns or merged headers | Strip the file to 3 or 4 core columns before upload [1][2] |
| Currency Mismatch | Wrong currency code in .qbo | Match the QBO currency code to the QuickBooks account currency [10] |
Match and Categorize Imported Transactions in QuickBooks
Once the file imports cleanly, follow your bookkeeping automation workflow to match and categorize transactions. Imported rows land in the For Review tab in QuickBooks Online or the Bank Feeds Center in Desktop. In short, they hit the review queue first.
QuickBooks will try to match imported rows to existing invoices, bills, or payments based on date and amount. When a match appears, click Match to link the records without creating a duplicate entry [2][1].
If QuickBooks can’t match a row on its own, categorize it before adding it to the books. That extra minute up front can save a lot of cleanup later.
You can also use bank rules for recurring descriptions to make future imports easier [2][10].
Before month-end close, compare your QuickBooks totals with the bank statement summary [17]. If the numbers don’t line up, the cause is often simple: a missing row, a sign error, or a duplicate [17].
Conclusion: Cleaner Imports and Faster Reconciliation
Start with the best file format you can get. Then convert PDFs into structured data, clean the columns, and use the right QuickBooks import path.
For PDF statements, ClearlyLedger handles extraction and runs a balance verification check, confirming that the sum of extracted transactions matches the statement's opening and closing balances before the file ever reaches QuickBooks [10][8]. Clean imports make matching faster and reconciliation more accurate.
FAQs
Can I import multiple accounts from one statement file?
No. You can’t import one statement file that contains multiple accounts into a single QuickBooks account.
Each file needs to match one specific bank or credit card account in your chart of accounts. That’s how QuickBooks knows where each transaction belongs.
If your source file includes several accounts, split it into separate files for each account before you import anything. It’s a small extra step, but it helps you assign transactions the right way and avoid reconciliation errors.
What should I do if my PDF conversion scrambles transactions?
PDFs are visual files. That sounds simple, but it creates a big problem during conversion: transactions can get scrambled.
A tool might merge two columns into one, split a single line into two entries, or drop formatting that keeps the statement readable. That’s why manual copy-pasting usually turns into a mess.
Use a bank-aware conversion tool instead.
Before you import anything into QuickBooks, put the converted file next to the original statement and check a few basics:
- Transaction count
- Date range
- Opening balance
- Closing balance
If any of those numbers don’t line up, something likely went wrong. A page could be missing, or the file may contain a duplicate entry.
How can I avoid duplicate transactions when importing?
Use .QBO whenever you can.
Here’s why: unlike CSV, .QBO includes a unique transaction ID called FITID for each row. That gives QuickBooks a way to spot transactions it has already brought in and skip them, even when the date ranges overlap.
If you have to use CSV, stick to non-overlapping date ranges only. Before you import, check the file, remove non-transaction rows like opening balances, and make sure the file doesn’t overlap with bank feed data that’s already in QuickBooks.
Loading interactive converter… Try ClearlyLedger free