How to Convert PDF Bank Statements to Excel
Match the PDF type to the right tool—copy-paste, Excel import, OCR, or converter—and always verify balances.
Last updated 2026-07-13
If I want clean bank data in Excel, I first check one thing: can I select text in the PDF or not? That single test tells me which path to use. If the text is selectable, I can use copy-paste or Excel’s PDF import. If it is not, I need OCR first. And before I trust any file, I verify the math: Opening Balance + Credits − Debits = Closing Balance.
Here’s the short version:
- I use manual cleanup for short, one-off statements.
- I use Excel PDF import for longer, text-based PDFs.
- I use OCR for scanned statements.
- I use a bank statement converter when I have recurring files or larger batches.
- I format dates as MM/DD/YYYY and amounts as $1,234.56 from the start.
- I keep each transaction on one row with these columns:
- Date
- Description
- Reference
- Debit
- Credit
- Balance
A small import error can throw off the whole sheet. One missed row, one flipped sign, or one split description is enough to break reconciliation. That’s why I do a final side-by-side check of the PDF and Excel file before I import anything into accounting software like QuickBooks.
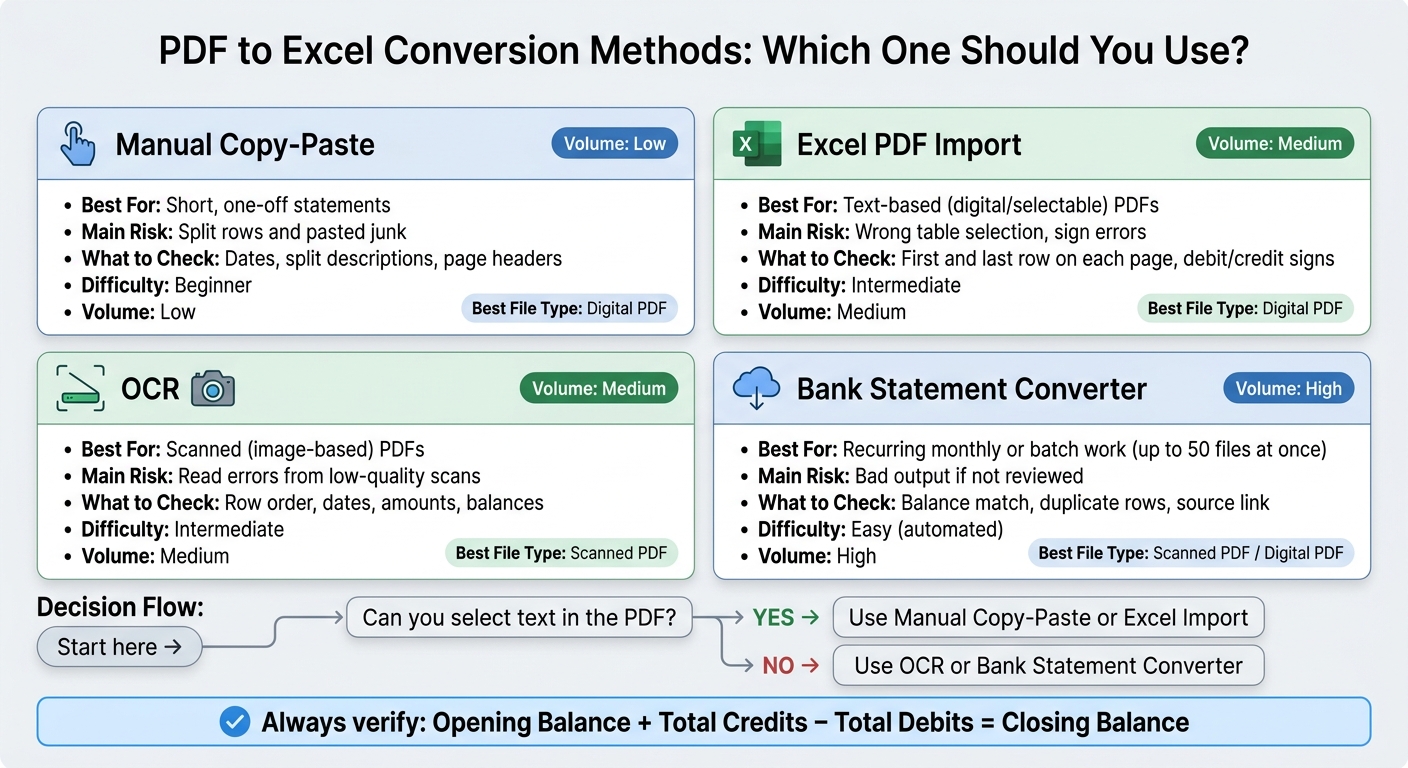
PDF to Excel Conversion Methods: Which One Should You Use?
How to Convert PDF Bank Statement to Excel
sbb-itb-2afa642
Quick Comparison
| Method | Best for | Main risk | What I check |
|---|---|---|---|
| Manual copy-paste | Short statements | Split rows and pasted junk | Dates, split descriptions, page headers |
| Excel PDF import | Text-based PDFs | Wrong table choice, sign errors | First and last row on each page, debit/credit signs |
| OCR | Scanned PDFs | Read errors from low-quality scans | Row order, dates, amounts, balances |
| Bank statement converter | Monthly or batch work | Bad output if not reviewed | Balance match, duplicate rows, source link |
In simple terms, I match the tool to the file type and volume, then I check the totals before I move on. That keeps the Excel file clean enough for reconciliation, review, or import.
2. Convert a Digital PDF to Excel Using Manual or Built-In Excel Tools
For text-based PDFs, use copy-paste for short files and Excel import for longer ones, or follow a complete guide to PDF bank statement conversion. If you're working with accounting data, the main job is simple: keep dates, descriptions, debits, credits, and balances in separate columns. Start with manual copy-paste for short files, then switch to Excel import when the statement is longer. [1]
Copy, paste, and clean a short statement by hand
For a very short, one-off statement, select the transaction text in your PDF viewer, paste it into Excel, and use Data > Text to Columns to split anything that landed in one column into separate fields. After that, clean it up line by line:
- Split descriptions: Long transaction descriptions often run across multiple lines in the PDF and paste into separate Excel rows. Combine them into one row and delete the extra row. [1]
- Dates and amounts: Convert dates to MM/DD/YYYY format and format dollar amounts to two decimal places, such as $1,234.56. Excel may bring these in as text, so apply the format yourself.
- Headers, footers, repeated headers, and subtotal rows: Delete page headers, footers, repeated column headers, and subtotal rows that came in with the transaction data. [1]
Then check the math: Opening Balance + Credits − Debits = Closing Balance. If it doesn't match, there's a good chance a row was skipped or duplicated, often where one page ends and the next begins. [1]
If the PDF is scanned, skip this method and use scanned bank statement OCR.
Use Excel's PDF import and check the detected tables
For structured statements, Excel can keep rows and columns lined up better than plain copy-paste. Go to Data > Get Data > From File > From PDF, select the statement, open the Navigator, and select Table objects. [1]
Pick Table items instead of Page items. Tables are more likely to keep dates, descriptions, debits, credits, and balances in the right columns from the start. [1] Once the data loads, review it with care:
- Check the first and last transaction on every page against the original PDF to make sure nothing was skipped at a page break. [1]
- Look for debits imported as positive numbers or credits imported as negatives and fix the signs.
- Remove any subtotal rows or repeated headers that were imported as though they were transactions. [1]
Fix split descriptions the same way you would during manual cleanup. You can also use Excel's TRIM function to remove extra spaces left behind during conversion. [1]
If the PDF is scanned instead of searchable, use OCR before importing. [1]
3. Use OCR for Scanned Statements and Check the Results
For scanned statements, OCR is the next step. With scanned PDFs, you need to turn the page image into text before export. [1]
Run OCR before exporting to Excel
Upload the PDF, run OCR on the statement layout, and then export to Excel or CSV. The file should line up with the same accounting columns: Date, Description, Reference, Debit, Credit, and Balance. [1]
OCR results depend mostly on scan quality. If the pages are skewed, low-resolution, faint, or laid out in multiple columns, extraction can fall apart or come back with partial rows. [1]
Check row order, amounts, and balances after OCR
OCR output needs a careful review before you use it for reconciliation or import. A small read error can throw off the whole sheet. These are the main checks: [1]
| Validation Step | What to Check | Why it Matters |
|---|---|---|
| Row Order | Transactions appear in the same sequence as the original statement | Prevents reconciliation gaps |
| Date Format | Dates are in MM/DD/YYYY format and pulled from the transaction row, not inferred from the statement header | Ensures transactions land in the right period |
| Description Integrity | Long descriptions weren't cut off or split across multiple rows | Needed for vendor identification and coding |
| Amount Accuracy | Debits and credits are in the correct columns and not swapped | Prevents balance errors |
| Running Balance | Balance progression matches the statement exactly | Confirms no transactions were missed mid-page |
After export, check page breaks, swapped signs, and the final balance. The math is simple: Opening Balance + Total Credits − Total Debits = Closing Balance. If the numbers don’t match, look for missing rows, duplicated rows, cut-off descriptions, repeated headers, or OCR misreads. [1]
If you process statements on a regular basis, the next move is a bank-statement converter for standardized output.
4. Use a Bank Statement Converter for Accounting-Ready Output
If you deal with recurring statements, a dedicated converter can turn a messy, repeat task into one clean workflow. Instead of doing the same cleanup over and over, a bank statement converter handles upload, parsing, verification, and export in one pass.[1]
Convert to a standardized Excel template with balance checks
ClearlyLedger exports a consistent spreadsheet with columns for Date, Description, Reference No., Debit, Credit, and Balance.[1] It also joins multi-line descriptions and keeps each date attached to the correct transaction row, not the statement period.[1][2]
The big safeguard here is balance validation. Before export, the tool checks whether opening balance + credits − debits matches the closing balance, then flags any mismatch.[1] If the math is off, you get a discrepancy flag instead of a file that slips into your books with errors.
Process recurring monthly files with batch upload and deduplication
For monthly reconciliations, batch upload cuts down the grunt work. ClearlyLedger supports uploads of up to 50 files at once, merges files, removes duplicates, and links each row back to the source PDF.[1][2]
That means less time piecing files together by hand and less risk of loading the same transaction twice.
Review pricing and data security for regular statement processing
ClearlyLedger has free tiers for light use, with paid plans starting at $15/month for higher volumes.[1]
For sensitive financial data, privacy rules matter just as much as output quality. Files are processed in memory, deleted after conversion, and never used to train AI models.[1] File transfers use TLS 1.3 encryption.[1]
Pricing and data handling should be the last filter when picking a converter for monthly statement processing.
5. Review the Excel File Before Reconciliation or Import
Validate balances, dates, and totals in Excel
After conversion, do one last QA pass before you import the spreadsheet into your accounting system. Start with a final balance check: Opening Balance + Total Credits − Total Debits = Closing Balance. If the numbers don’t match, stop there and track down the missing or duplicated row before import. That simple check can catch missing rows before they throw off reconciliation.
Also review the first and last row on each page for missing or duplicated transactions [1]. It’s an easy place for errors to slip in, especially when data moves from PDF to Excel.
Then confirm the basics:
- Dates should be the actual transaction dates and formatted as MM/DD/YYYY [1]
- Amounts should use $1,234.56 format [1]
- Each transaction should sit on a single row with no blank lines in between [1]
Keep the PDF and Excel file open side by side while you review [1]. That makes it much easier to spot split descriptions, along with debits and credits that picked up the wrong signs [1].
Choose the right method for your volume and accuracy needs
Match the method to the file type and the amount of work in front of you. Use manual cleanup for short one-off files, Excel import for text-based PDFs, OCR for scanned statements, and a bank statement converter for recurring high-volume work [1].
FAQs
How do I know if my PDF needs OCR?
You need OCR if your bank statement is an image-only PDF, a scanned document, or an older multi-page statement with no selectable text.
A simple way to check: try to highlight and copy a few words. If that works, the file is probably text-based. If the page acts like one flat image, or your tool can’t read the text or table layout, you’ll likely need OCR to turn the statement into a usable spreadsheet.
What should I do if debits and credits import incorrectly?
Use built-in balance checks to catch mismatches before export. The math should be simple: opening balance + credits - debits = closing balance.
Before you import anything into your accounting software, do a quick review of the statement period, opening and closing balances, low-confidence rows, and the first and last transaction on each page. That last part matters more than it sounds. It’s often where sign flips, missed wrapped descriptions, repeated headers, subtotal rows, or wrong guessed dates tend to show up.
How can I verify the Excel file is accurate before import?
Check that the opening balance plus credits minus debits equals the closing balance.
Before import, compare the statement period, opening and closing balances, low-confidence rows, and the first and last transactions on each page with the original PDF. That quick check helps catch common issues like repeated headers or reversed signs.
Loading interactive converter… Try ClearlyLedger free